Sculpfun E1 Dual Review: 12W Diode and IR Laser in One
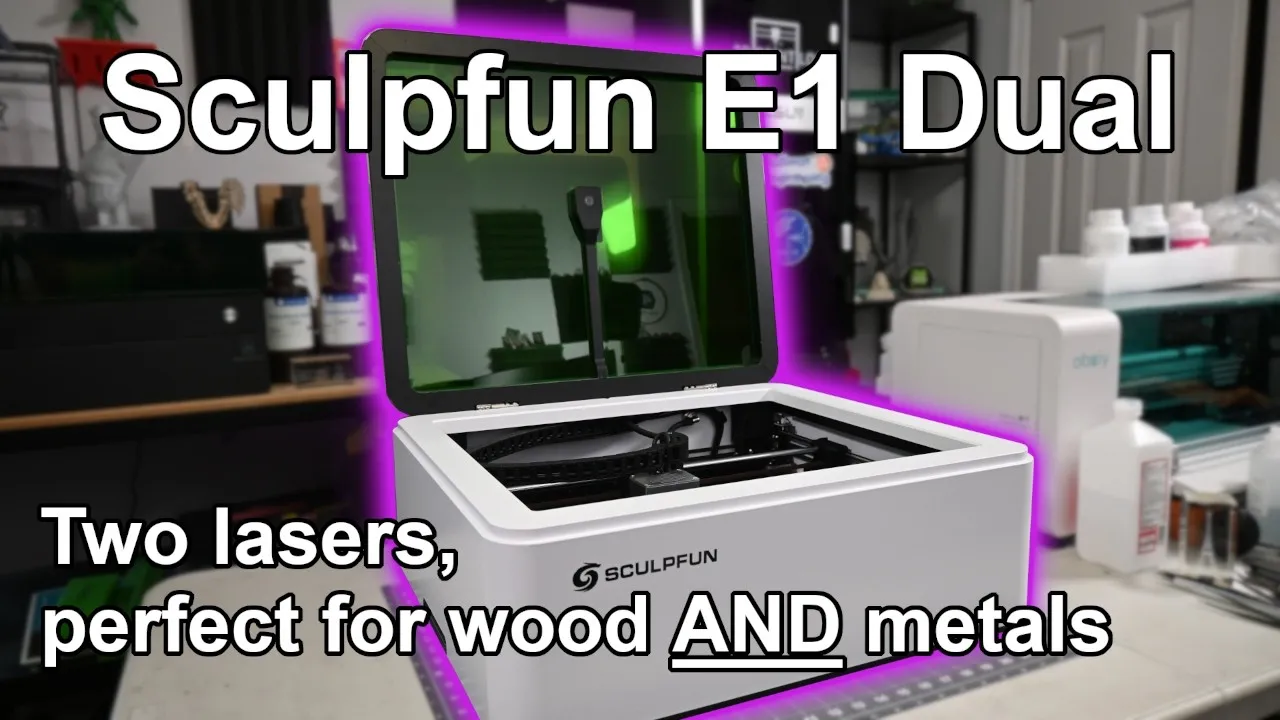
A precise enclosed laser for detail engraving and permanent marks on bare metal. If cutting thicker material is the priority, look at the 21W E1 Pro instead.
Check price at AmazonOn this page
The Sculpfun E1 Dual comes with two swappable laser modules: a 12W blue diode for cutting and engraving, and a 3W infrared module that can permanently mark bare metal. After more than thirty jobs across wood, acrylic, slate, leather, aluminum and stainless steel, I don’t think the 12W rating tells you what this machine is good at. This Sculpfun E1 Dual review covers the fine-detail engraving, the camera, the IR module on metal, and whether that second laser is worth the extra money.
Sculpfun E1 Dual Specs and the E1 Lineup
The E1 is an enclosed diode laser engraver and cutter, and Sculpfun sells four versions of it. The E1 has a 12W diode. The E1 Dual adds a 3W infrared module. The E1 Pro has a 21W diode, and there’s an E1 Pro Dual. I tested the E1 Dual.
The number that matters is the spot size. Sculpfun rates the 12W module at 0.04 x 0.06mm, the finest spot in the E1 line. The 21W Pro has a bigger spot at 0.06 x 0.08mm. More watts, bigger dot. And bigger isn’t always better.
The E1 has a 400 x 320mm work area, takes material up to 42mm high, uses CoreXY motion, and is rated for speeds up to 600mm/s. It’s also a fully enclosed Class 1 laser.
The box includes the honeycomb bed, air assist, exhaust hose, tools, calibration targets, and both laser modules. You don’t need to buy anything else to start cutting.
Setup: Five Minutes, No Assembly
There isn’t any assembly. Open the box, pull out a few pieces of foam, plug in the air compressor’s power and hose, and you’re ready to engrave. Five minutes, maximum. Sculpfun says you can go from unboxing to your first project quickly, and that held up.
One thing you can’t skip. A USB security key has to be plugged into the back of the machine before it will turn on. No key, no laser. So don’t lose it, or you’ll spend twenty minutes wondering why the machine won’t power on.
Enclosure and Lighting
The enclosure does its job. Smoke stays inside the box during a job, and the fans pull it out fast once the cut is done. I never had smoke rolling out at me while I worked.
The lighting is the weak spot. The interior lights shut off after about thirty seconds, and even when they’re on, I wish they were brighter. It can be hard to see inside the enclosure, and that matters when you’re checking whether a cut went all the way through.
Two Laser Modules: 12W Blue Diode and 3W Infrared
The modules are the reason to buy this version of the machine.
The 12W blue diode runs at 455nm and handles the organic materials: wood, leather, dark acrylic, paper, and coated metals. The 3W infrared module runs at 1064nm and can directly mark bare metals that the blue diode can’t.
Swapping between them is easy. Take out two small screws, unplug the module, slide it out, slide the new one in, and plug it back in. I swapped them about a dozen times during testing and it never became annoying. The camera didn’t need recalibration after a swap either, which saved a step every time.
Two things to know about the IR module. It has no air assist nozzle, so the hose sits there unattached while you use it. And it has a built-in red positioning light, which makes it easy to line up a small metal part by hand.
Focus, Air Assist and Noise
Focus is manual. Flip down the focus lever, loosen the screws, lower the module until the lever touches your material, and tighten it back up. It’s quick and easy to get right.
One thing is worth watching. Focused on 3mm plywood sitting on the honeycomb panel, the module sits low enough that the top screw doesn’t make contact with it, so one screw holds it instead of two. I expected that to become a problem. Over a month and thirty-plus jobs, it never slipped once. Autofocus would have been a nice addition on a machine with a camera this good, but it isn’t required.
The included air assist is strong enough. It cleared smoke and debris and kept the edges of my cuts and engravings clean. It made the biggest difference on leather, where soot tends to smear around the engraving.
With the compressor running, I measured about 55 dB from two feet away.
The honeycomb panel is included, and it’s good. It gives plenty of support and ventilation underneath, and it lifts out so you can dump the debris that collects under it. Do that often. That debris is flammable, and it sits directly under a laser.
Camera Positioning
The camera is the best part of this machine. It’s what I’d point to if you asked why you’d buy the E1 over an open-frame laser at the same price.
Calibration in LightBurn was easy. The setting that trips people up is the lens type, so choose “standard” and it works. Sculpfun includes both versions of the calibration pattern in the box, so you don’t have to print one.
Once calibrated, alignment was under a millimeter in my tests. That’s good enough to place a design on a piece of scrap and trust it. I spent the month laying jobs out on scraps and offcuts, dragging designs into whatever usable space was left. If you do a lot of one-off work, that changes how much material you throw away.
There’s one catch. The camera needs a second USB cable running to your computer, so that’s two cables from the machine to your desk.
Software: Sculpfun Space and LightBurn
Sculpfun Space is free and easy enough to get started with. Pick the E1 and it configures the workspace automatically. But there’s no material library to speak of, and the few presets I found were still labeled in Chinese. It’s fine for beginner projects, but I think most owners will move to LightBurn eventually.
LightBurn is still my preferred software. I use its material test tools constantly to dial in speed and power, and if you plan to use the E1 regularly, I think it’s worth the license cost. Setup was easy. Sculpfun doesn’t provide a configuration file, but you don’t need one. Add a GRBL device, enter the 400 x 320mm workspace, and you’re ready to go.
Safety: Class 1 Enclosure, With One Complaint
The good news is the enclosure. This is a Class 1 machine, and the cover does the work that goggles do on an open-frame laser. That’s the biggest reason to buy an enclosed machine, especially if it lives anywhere near people or pets.
The lid sensor works. Open the lid mid-job and the laser stops almost immediately, every time.
Here’s my complaint. At least in LightBurn, once that alarm fires, you can’t resume the job when you close the lid again. You stop and start over from the beginning. So an accidental lid opening costs you the job.
There’s also no tilt detection, which some competing enclosed lasers now include.
The exhaust fan removes smoke from the enclosure, but it doesn’t filter it. I ran the supplied hose outside, and that’s what I’d recommend. Sculpfun’s marketing page says the E1 is good for indoor use, but it doesn’t spell out that the exhaust needs to be vented outdoors. Sculpfun sells the SP1 purifier for when outside ventilation isn’t possible. I haven’t tested it.
Wood Cutting and Photo Engraving
Wood is where a diode laser earns its keep.
I cut 3mm birch plywood in a single pass at 450mm/min. For a 12W diode, that’s a fast single-pass cut.
For engraving, I pushed speeds as high as 30,000mm/min, and the results stayed consistent enough to show that the motion system can make use of those higher speeds.
My kerf test measured about a 0.07mm offset, which backs up what I was seeing from that tightly focused diode. And it’s why photo engraving works on this machine. My best results came at 6,000mm/min and 50 percent power, with a wide tonal range. A smaller spot can preserve finer detail than the larger spot you normally get as diode power goes up.
Acrylic: Both Lasers on One Part
A blue diode can’t directly cut clear acrylic. The beam passes straight through it. Opaque and dark colored acrylics work great.
I cut 3mm black acrylic in two passes at 450mm/min.
Black acrylic is also a perfect match for the 3W IR laser. The IR leaves a crisp, high-contrast white mark on the surface, but it won’t cut it. So I used both. I cut a stack of blanks with the 12W diode, swapped modules, and engraved white text onto them with the IR. Two lasers, one part, and I didn’t have to move or re-align anything.
Slate and Leather
Both of these came out clean on the first serious attempt.
The slate coaster is my favorite piece from the whole month. The camera made it easy to position text on a circular blank, which is normally the fiddly part of slate.
Leather engraved deep and clean on a veg tan bracelet, and the air assist cleared the soot instead of letting it darken the edges.
Metal Marking: Aluminum and Stainless Steel
The blue diode can mark coated aluminum cards by removing the coating. It can’t directly engrave bare aluminum. That’s where the IR module comes in. On raw aluminum I got clean black marks at 200mm/min, 100 percent power, and a 0.1mm line interval. Speed up from there and the mark goes lighter, toward white instead of black.
Stainless steel is where I expected to be disappointed, and where the IR module made its case.
Some 10W blue diodes can color mark stainless with oxide colors like blues, purples and oranges. I couldn’t get any color out of the E1’s 12W diode. Black and gray oxides on the surface, and that was it.
Then I swapped to the IR module, and it engraved into the surface of the steel. Not an oxide layer sitting on top, but a permanent engraving in the metal. The stainless steel tags I made came out great.
If you need permanent marks on bare metal, this is the version of the machine to buy.
Pricing: E1 vs E1 Dual vs E1 Pro
At the time of review, the E1 is $499 and the E1 Dual is $949 at Sculpfun’s store, so you’re paying $450 for the IR module. The IR3 module costs $499 on its own. If you know you’ll want it eventually, buying the Dual saves about fifty dollars.
The savings are bigger with the Pro. The E1 Pro is $799 and the Pro Dual is $1,149, which makes the IR upgrade $350 instead of $499 bought separately.
Buy the E1 Dual if you want fine engraving and permanent marks on metal. Buy the E1 Pro if cutting thicker material faster is the job, and accept a slightly bigger dot for it. And if you think you’ll want the IR module’s metal engraving later, get a Dual up front. It costs less than adding the module afterward.
Verdict: Should You Buy the Sculpfun E1 Dual?
The Sculpfun E1 Dual is a precise, versatile enclosed laser. Setup takes minutes, the camera is excellent, and that fine 12W diode is particularly good at detailed engraving. The IR module then adds permanent marks on bare metals. After more than thirty jobs, nothing loosened, broke, or needed adjustment.
My biggest complaint is that opening the lid kills a LightBurn job rather than pausing it. I’d also like tilt detection and better interior lighting.
I can recommend the E1 Dual if you want detail work and metal marking from one enclosed machine, and you want to be running jobs the day it arrives. If cutting thicker material is your priority, look at the 21W E1 Pro instead. And if you want an enclosed laser with a camera but don’t need the second module, my Creality Falcon A1 review is a good comparison.
Check the latest price on the Sculpfun E1 Dual
Pros and cons
✓ Pros
- The 12W diode has a fine spot. My kerf test measured about a 0.07mm offset, and photo engraving held its detail
- The 3W infrared module engraves into bare stainless steel and leaves black marks on raw aluminum
- Camera alignment was under a millimeter after calibration, and it didn't need recalibrating after a module swap
- No assembly. Five minutes from opening the box to the first job
- Fully enclosed Class 1 design with a lid sensor that stopped the laser every time
- Honeycomb bed, air assist, exhaust hose and calibration targets are all in the box
- Quiet. About 55 dB at two feet with the compressor running
- Module swaps take two screws and one plug
✗ Cons
- Opening the lid mid-job ends a LightBurn job. You can't resume, you start over
- No tilt detection
- Interior lights shut off after about thirty seconds and aren't bright enough
- The Dual costs $450 more than the standard E1
- The 12W diode couldn't produce oxide colors on stainless steel, only black and gray
- Manual focus, and the camera needs its own second USB cable
- Sculpfun Space has no material library, and the few presets were labeled in Chinese
- The exhaust fan doesn't filter smoke, so you need to vent it outside
Specs
| Laser Modules | 12W blue diode (455nm) and 3W infrared (1064nm), swappable |
|---|---|
| Spot Size (12W module) | 0.04 x 0.06mm (rated) |
| Kerf Offset (tested) | About 0.07mm |
| Work Area | 400 x 320mm |
| Max Material Height | 42mm |
| Motion System | CoreXY |
| Rated Max Speed | 600mm/s. Engraving stayed consistent up to 30,000mm/min in my tests |
| Focus | Manual, with a flip-down focus lever |
| Air Assist | Compressor included (the IR module has no air assist nozzle) |
| Camera | Built in, under 1mm alignment after calibration |
| Safety | Class 1 enclosure with a lid sensor. No tilt detection |
| Noise (tested) | About 55 dB at two feet with the compressor running |
| Software | Sculpfun Space (free), LightBurn (GRBL device) |
| Connectivity | USB, plus a second USB cable for the camera |
Where to buy
- Sculpfun E1 Dual (12W Diode + 3W Infrared) on Amazon$959 →
- Sculpfun E1 (12W Diode)$499 →
- Sculpfun E1 Pro (21W Diode)$799 →
- Sculpfun E1 Pro Dual (21W Diode + 3W Infrared)$1,149 →
- Sculpfun IR3 3W Infrared Module for the E1$499 →
Prices may have changed since this review.
FAQ
Is the Sculpfun E1 Dual worth it?
It is if you want detailed engraving and permanent marks on bare metal from one enclosed machine. At the time of review the E1 is $499 and the E1 Dual is $949, so the infrared module adds $450. The module costs $499 on its own, so buying the Dual up front saves about fifty dollars if you know you'll want it. If you only work with wood, leather and acrylic, the standard E1 has the same 12W diode.
Can the Sculpfun E1 Dual engrave metal?
Yes, with the 3W infrared module. On raw aluminum I got clean black marks at 200mm/min, 100 percent power and a 0.1mm line interval. On stainless steel the IR module engraved into the surface for a permanent mark. The 12W blue diode can only remove the coating from coated aluminum and leave black and gray oxides on stainless.
What materials can the Sculpfun E1 Dual cut?
The 12W blue diode cut 3mm birch plywood in a single pass at 450mm/min and 3mm black acrylic in two passes at 450mm/min. A blue diode can't directly cut clear acrylic because the beam passes through it. The infrared module marks black acrylic with a crisp white line, but it won't cut it.
Does the Sculpfun E1 Dual work with LightBurn?
Yes. Sculpfun doesn't provide a configuration file, but you don't need one. Add a GRBL device and enter the 400 x 320mm workspace. For the camera, set the lens type to "standard" during calibration. One catch is that opening the lid mid-job triggers an alarm, and LightBurn can't resume the job afterward.
Should you buy the Sculpfun E1 Dual or the E1 Pro?
Buy the E1 Dual for fine engraving and metal marking. Sculpfun rates its 12W module at a 0.04 x 0.06mm spot, the finest in the E1 line. The 21W E1 Pro has a larger 0.06 x 0.08mm rated spot, and it makes more sense if cutting thicker material faster is the job. I tested the E1 Dual only, so I can't give you cut speeds for the Pro.
This Sculpfun E1 Dual was provided by Sculpfun for review. This post contains affiliate links. If you purchase through them, I may earn a small commission at no extra cost to you. All opinions are my own.
See how the Sculpfun E1 Dual compares to the other lasers I've tested