ACMER P3 Review: The Fastest 48W Laser I've Tested
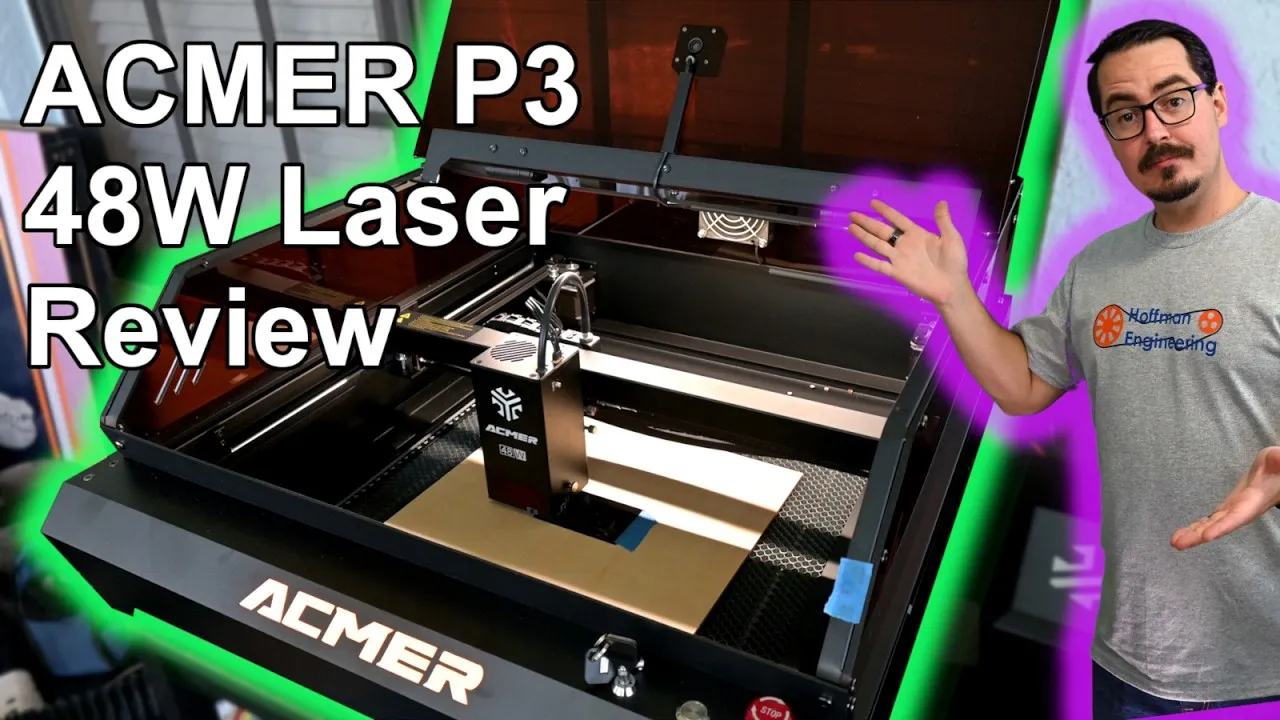
A powerful, fully enclosed diode laser that works out of the box, with the honeycomb panel, air assist compressor and camera included. It makes the most sense if you want fast cutting and a ready-to-run machine more than the lowest price for a 48W laser.
Check price at ACMEROn this page
How fast can an enclosed diode laser go? The ACMER P3 pairs a 48W diode module with a Core-XY motion system rated for 48,000mm/min, and it cut 3mm birch plywood in a single pass at 1150mm/min. In this ACMER P3 review I cover a month of cutting and engraving wood, acrylic, slate, leather, coated aluminum and stainless steel, plus the camera, the enclosure and the quirks that come with Core-XY on a laser.
What the ACMER P3 Is
The P3 is a fully enclosed diode laser engraver. Diode lasers produce a visible blue beam at 405nm, which works well for cutting and engraving wood, dark acrylic and natural materials like leather and stone.
There are limits. A blue diode can’t directly cut clear acrylic, glass usually needs a coating, and it can’t engrave bare metal. It can color mark stainless steel with oxide colors, which I tested further down.
Core-XY Motion and the 48,000mm/min Speed Claim
The most unusual thing about the P3 is its Core-XY kinematics. Two stationary motors drive the laser module through a long belt loop, and both motors work together to move it. That adds torque, which raises the possible acceleration and speed.
ACMER rates the P3 at 800mm/s, or 48,000mm/min, and it does move that fast. I ran the head 300mm side to side, and there’s a clear difference between 10,000 and 48,000mm/min. I come back to how much that speed matters in practice further down.
ACMER P3 Laser Module Options: 48W, 24W, IR and 2-in-1
ACMER sells the P3 with several modules:
- 48W diode, the one I tested. A switch on its side turns off half the diodes for a 24W mode.
- 24W diode as a stand-alone module. It’s cheaper and still cuts wood and acrylic easily, only slower.
- 2W infrared at 1064nm, for marking brass, stainless steel and plastics like acrylic, ABS and PLA.
- 2-in-1, a 10W diode and the 2W infrared laser in one module, so you can pick the wavelength without swapping.
Why would you want 24W on a 48W machine? Lower power gives you more control, and that finesse can help with engraving, especially photos.
On the 48W module, the power cable and air assist hose come in at the top, and a strong fan blows through it to cool the diodes and clear smoke. My one complaint is the power switch. It feels fragile, and every time I flipped it I worried it would snap off. It hasn’t yet.
At the bottom is a removable magnetic window that blocks reflected laser light while still letting you see the work. It pops off for cleaning, and behind it is the air assist nozzle.
Focus
The focus tool lives in the bottom of the module. Unscrew the knob and slide the tool out. The 48W module focuses at 8mm, which is the tool fully extended. Loosen the module, lower it until the tool rests on your material, tighten it, and retract the tool.
Focus is all manual. I’d like a motorized Z-axis and autofocus, but for most laser work you don’t need them, and leaving them out helps keep the P3’s price down.
Enclosure and Class 1 Safety
The enclosure has a sheet metal base and a translucent plastic cover with a nice curve to it. The P3 carries a Class 1 laser safety certification, so with the cover closed you can run it without eye protection, and so can anyone else in the room.
There are small vents near the front where, from the right angle, you can see onto the honeycomb panel. The module’s window blocks most of the light anyway, so I’m not worried about them.
Lift the cover and a safety switch pauses the job. Close it and the job resumes on its own. That’s a great feature to see.
An exhaust fan at the back comes with about 5 feet of ducting, for a fume extractor or a window. The enclosure does a decent job with smoke and fumes, but some smell escapes, especially when cutting acrylic.
Honeycomb Panel and the Slide-Out Drawer
A honeycomb panel is included, with 4 magnetic pins to hold material down. It’s screwed to the base so it doesn’t shift, and the 400 x 400mm work area never left me short on space.
The best part is that the base is a drawer. It slides out so you can reach the honeycomb panel without opening the lid, and I used it on almost every cut. It runs in a plain groove without bearings but still slides easily, and the low-profile design keeps the P3 thin and light.
Built-In Camera Accuracy
The HD camera sits at the top of the cover. In LightBurn it gives you a live view and a snapshot of the work area, so you can place designs exactly where you want them and waste less material.
This is the most accurate laser camera I’ve tested so far. Calibration with the included foam dots came out almost millimeter-perfect. When I engraved a design and updated the snapshot, the result landed exactly where I’d placed it. That made batch jobs easy: I’d drop several copies onto the material and run them.
The camera sees the whole work area whether the module is homed at the front or parked at the back.
Controls, Ports and Air Assist
The front has a key lock (two keys included), the main power switch and the emergency stop. On the back are switches for the exhaust fan and the LED lights. I wish the fan started on its own with a job, but it’s quiet enough that I left it running.
The LED lights sit on top of the enclosure near the back. That’s too far back: the gantry and module often shadow the spot being cut, which is where you want to look.
On the side are the power input and a single USB port that handles both the laser and the camera feed, which is convenient. Next to them are the air assist power and hose connectors. The compressor’s rubber feet isolate its vibration well, it puts out plenty of air, and it kept my cut edges clean. You switch it on and off from software, depending on the material.
Accessories
ACMER sells a few add-ons for the P3:
- A rotary attachment for round and cylindrical objects
- A smoke and air purifier with a 3-layer HEPA filter and activated carbon
- An auto-feeder conveyor that gives you endless Y-axis engraving if 400 x 400mm isn’t enough
- A 2W 1064nm infrared module
It’s good to know you can grow into it later.
Assembly and Setup
The P3 arrives almost entirely assembled, in a printed retail box. Lift it out, peel off the plastic and tape, and you’ll find the accessories boxed up inside the enclosure in plenty of foam.
The only assembly is removing a couple of shipping brackets, sliding in the laser module, connecting its cable and air assist hose, and plugging the compressor into the side. I was up and running in minutes.
Software: LightBurn and LaserGRBL
The P3 runs on any GRBL compatible software. A copy of the free LaserGRBL is on the included USB drive, so you can start with that.
I’m a big fan of LightBurn, though, and I recommend a license for any laser engraver. The P3 worked perfectly with it. ACMER puts a machine configuration file on the USB drive, so setup is a single import.
Cutting Wood With the ACMER P3
On wood, the P3 is the fastest 48W diode laser I’ve tested. I underestimated it on my first two test patterns on 3mm plywood. It ended up cutting 3mm plywood in a single pass at 1150mm/min, or about 19mm/s, which made intricate pieces like a living hinge go quickly. It also had enough power to cut 30mm thick wood in a single pass.
My kerf tests put the ideal kerf offset at 0.9mm in 48W mode, which matches the dot size ACMER advertises. Switching to 24W mode didn’t shrink it: it stayed at 0.9mm. You’d usually expect a smaller dot at lower power, so 24W mode looks less like a resolution upgrade and more like finer control over power.
Photo engraving worked well. My results were better in 24W mode, but I think that came from dialing in other settings more than from the mode change.
Cutting Acrylic
As a blue diode, the P3 can’t cut clear acrylic, but dark acrylic is no problem. In 48W mode I cut 3mm black acrylic in a single pass, and engraving results were great.
On my first batch of 3D Print Log keychains I saw marks where the laser first pierced the acrylic, both at the start of the inner hole and on the outer cut. It’s the first laser where I’ve noticed this, possibly because of the 48W power or the faster cutting speed. Thinking back to my CNC days, I turned on LightBurn’s lead-in feature so the laser pierces off to the side and then moves onto the contour. That removed the marks completely.
Thick acrylic is fine too. 30mm black acrylic took 4 passes at 100mm/min.
Slate, Leather, Coated Aluminum and Stainless Steel
Slate: The 48W laser blasted away the surface of my slate coasters for a great 3D effect, and the camera made placing the design on each coaster easy.
Leather: With this much power it’s easy to cut too deep. Dial the power back a little and you get great results with little edge darkening.
Coated aluminum: The P3 removed the coating cleanly at 15,000mm/min. Details were crisp across every color I tried.
Stainless steel: The P3 can’t engrave metal, but by heating the surface it can color mark stainless with oxide colors. 24W mode was perfect for rich blues, purples and oranges. 48W mode was too powerful and heated the surface enough to warp it.
Does Core-XY Matter on a Laser Engraver?
Core-XY has spread fast through 3D printers, where both axes matter equally and a light toolhead helps in every direction. On a laser, one axis (usually X) runs back and forth at full speed while the other creeps along. And cutting speeds are slow enough that Core-XY’s advantages are hard to see.
It also changes how the machine feels by hand. Between test patterns I push the head around to the next spot. On a cartesian laser you can slide it along X alone. On Core-XY, a diagonal takes one motor and straight left-right takes both, so it’s hard to move along only one axis.
In practice that rarely mattered. I positioned almost every design with the camera. The exception is LightBurn’s test pattern, which you can’t place with the camera, and I run a lot of those.
The Off-Center Nozzle
The nozzle sits well off center on the module, and with the dark window in front it’s hard to see where the laser will start when you position it by eye. You could pull the window off each time, but that’s slow. I put a small piece of tape on the module to mark the nozzle position, and that made eyeballing it much easier.
Pricing
At recording, the P3 48W sold for $1,499, the 24W for $1,199, and the 2-in-1 (10W diode plus 2W infrared) also for $1,199. As of November 2026, ACMER lists the Basic Packs at $1,199 for the 48W, $999 for the 24W and $1,099 for the 2-in-1.
The P3 isn’t the most expensive 48W laser, but several cost less. The P3 includes the enclosure, honeycomb panel and air assist compressor, and it arrives almost fully assembled. Add those to the other machines and the P3 looks like good value for the money.
Verdict: Should You Buy the ACMER P3?
The ACMER P3 never let me down, from the nearly assembled unboxing through a month of tests. The 48W module surprised me: it’s the fastest cutting 48W diode laser I’ve tested. I can’t tell you whether ACMER has better diodes, lenses or mirrors than the competition, but together they make a well-focused laser that ate through material quicker than the rest. The 24W mode earns its switch for photo engraving and stainless steel colors.
The enclosure is packed with useful features: a full-size honeycomb panel, a drawer I used far more than expected, a very accurate camera and an included compressor. Core-XY delivers fast travel, though I didn’t see it make a big difference in real jobs. The quirks are small: a flimsy-feeling power switch, manual focus, lights that cast shadows and a nozzle that’s hard to see.
Get the P3 if you want a powerful, fully enclosed diode laser that works out of the box: plug in a few cables and it’s ready. If the lowest price for 48W matters more to you than the enclosure and included extras, cheaper machines exist. For me it earns a solid recommendation.
Check the latest price on the ACMER P3 at ACMER
Pros and cons
✓ Pros
- Fastest cutting 48W diode laser tested. 3mm birch plywood in a single pass at 1150mm/min
- Enough power to cut 30mm thick wood in a single pass
- Most accurate laser camera tested so far, almost millimeter-perfect after calibration
- Class 1 enclosure that pauses when the lid opens and resumes when it closes
- Honeycomb panel slides out on a drawer, so you can load material without opening the lid
- Honeycomb panel, magnetic pins and air assist compressor included
- Arrives almost fully assembled. Up and running in minutes
- 24W mode is useful for photo engraving and for colors on stainless steel
✗ Cons
- The 48W/24W power switch feels fragile
- Manual focus only, no motorized Z-axis or autofocus
- Some smell escapes the enclosure, especially when cutting acrylic
- Exhaust fan doesn't turn on automatically with a job
- LED lights sit too far back, so the gantry shadows the spot being cut
- Off-center nozzle behind a dark window is hard to eyeball when positioning by hand
- Core-XY makes it hard to push the head along only one axis by hand
- Showed pierce marks on acrylic until LightBurn's lead-in feature was turned on
Specs
| Laser Power | 48W diode, with a switch for 24W mode |
|---|---|
| Wavelength | 405nm (visible blue) |
| Work Area | 400 x 400mm |
| Motion System | Core-XY |
| Rated Max Speed | 48,000mm/min (800mm/s), reached in a 300mm travel test |
| Kerf Offset (tested) | 0.9mm in both 48W and 24W mode |
| Focus | Manual, with a built-in 8mm focus tool |
| Air Assist | Compressor included, switched from software |
| Camera | Built-in HD camera, works with LightBurn |
| Software | LightBurn or LaserGRBL (GRBL compatible) |
| Connectivity | One USB cable for the laser and the camera |
| Safety | Class 1 enclosure, lid pause switch, key lock, emergency stop |
Where to buy
- ACMER P3 48W (switchable to 24W) Basic Pack$1,199 →
- ACMER P3 24W Basic Pack$999 →
- ACMER P3 2-in-1 (10W Diode + 2W IR) Basic Pack$1,099 →
- ACMER Rotary AttachmentCheck price →
- ACMER Auto-Feeder ConveyorCheck price →
- ACMER Smoke and Air PurifierCheck price →
- ACMER 2W 1064nm Infrared Laser ModuleCheck price →
Prices may have changed since this review.
FAQ
Is the ACMER P3 worth it?
If you want a powerful, fully enclosed diode laser that works out of the box, yes. It was the fastest cutting 48W diode laser I've tested, and the price includes the enclosure, honeycomb panel and air assist compressor. Other 48W lasers cost less, so count those included parts when you compare.
How fast can the ACMER P3 cut wood?
In 48W mode it cut 3mm birch plywood in a single pass at 1150mm/min (about 19mm/s). It also cut 30mm thick wood in a single pass.
Do you need laser safety glasses with the ACMER P3?
The P3 has a Class 1 laser safety certification, so with the enclosure closed you can run it without eye protection. A switch on the cover pauses the job when you lift it and resumes it when you close it.
Does the ACMER P3 work with LightBurn?
Yes. It works with any GRBL compatible software. ACMER includes a LightBurn machine configuration file on the USB drive, and the built-in camera works with LightBurn for positioning designs. A copy of the free LaserGRBL is on the drive too.
What materials can the ACMER P3 engrave and cut?
Wood, dark acrylic, slate, leather and coated aluminum all worked well, and it color marks stainless steel with oxide colors. As a blue diode laser it can't cut clear acrylic or glass, and it can't engrave bare metal.
This ACMER P3 was provided by ACMER for review. This post contains affiliate links. If you purchase through them, I may earn a small commission at no extra cost to you. All opinions are my own.
See how the ACMER P3 48W compares to the other lasers I've tested