How Deep Can a Fiber Laser Engrave Slate? 2.8mm Tested
On this page
Slate coasters are a staple of laser testing. Almost any laser, diode or fiber, can mark the surface with a crisp, high-contrast white. But after deep engraving brass coins with a fiber laser, I wanted to know what happens when you go into the stone instead of across it. Does slate engrave cleanly, or does it crumble to dust?
This tutorial walks through deep engraving slate with a fiber laser, start to finish: sourcing the blanks, focusing, two rounds of frequency and pulse tests in LightBurn, and the 3D Slice settings that produced a 2mm deep fossil and a 2.8mm deep sailing ship.
The Laser: ComMarker B6 60W MOPA
I used the ComMarker B6 60W MOPA fiber laser. ComMarker sent it to me for review. They didn’t pay for the review or this video; I still had the machine, so it was the obvious tool for the experiment. You can read the full ComMarker B6 review for everything else about it.
Fiber lasers are built for metals and plastics, but they also do surprisingly well on darker stone like slate. The MOPA source matters here because it lets you adjust the pulse duration (the Q-pulse) as well as the frequency, and both turned out to decide whether the slate engraves or melts.
Sourcing Slate Coaster Blanks
Slate coaster blanks are easy to find from lots of suppliers, in squares and many other shapes. I bought square ones (24 pack, 48 pack).
Pay attention to the listing name:
- “Slate coasters” usually arrive with rubber or felt feet already attached.
- “Slate blanks” usually come without feet. You can buy feet separately and stick them on.
My coasters measure 100 x 100mm and vary from 3 to 7mm thick. After the border, that leaves 88 to 90mm of engravable area in the center. They start out pretty flat, which makes them a good laser material, and they have a solid, premium weight that makes them a nice gift.
Focusing on Uneven Slate
Because the thickness varies from coaster to coaster, refocus before every engraving. The B6 has built-in autofocus, which makes this quick: put the slate under the autofocus dot, press Auto, and the head moves up or down to the correct focal distance. When it stops, you’re ready.
I put a piece of wood under the slate as a spoilboard. Fiber lasers don’t work on wood, and since I didn’t know how fast the laser might punch through the stone, I’d rather it hit the wood than mark up the metal work surface. The wood isn’t required.
First Frequency and Pulse Test
Every new material needs its own settings, and LightBurn’s material test generator is made for this. Since the goal was depth, the first grid covered a wide range:
| Setting | Value |
|---|---|
| Frequency | 80 to 2000kHz |
| Q-pulse | 50 to 300ns |
| Power | 95% |
| Speed | 2000mm/s |
| Line interval | 0.05mm |
| Passes | 10 per cell |
This test was fascinating to watch. The higher frequencies dumped so much heat into the slate that it turned molten, and cells stayed glowing red after the laser moved on to the next one.
I ran a fume extractor the whole time to keep dust and fumes down. As you’ll see, it wasn’t enough for the amount of stone dust this process makes.
Results: every frequency above 240kHz left a molten, raised, bubbly surface. Almost no material came off; the stone melted and turned porous. The 80kHz row was the promising one, with clean material removal. Q-pulse didn’t make much difference at that frequency.
Second Test: Narrowing In
Power, speed and line interval looked good, so I kept them and narrowed the grid around 80kHz:
| Setting | Value |
|---|---|
| Frequency | 10 to 150kHz |
| Q-pulse | 10 to 300ns |
| Power | 95% |
| Speed | 2000mm/s |
| Line interval | 0.05mm |
| Passes | 5 per cell |
Far more material came off this time. Toward the short-pulse side of the grid it removed less and less, until around 10ns it left a clean, high-contrast white mark.
Results: frequencies under 30kHz or Q-pulse durations under about 25ns only marked the surface. A little above those, material removal was very good. The sweet spot was 130kHz with a 250ns Q-pulse.
Height Maps and LightBurn’s 3D Slice Mode
With settings dialed in, the next piece is the design. LightBurn’s 3D Slice mode engraves a design one layer at a time over many passes, which gives a 2.5D relief. It reads a specially made grayscale image: lighter pixels get fewer passes and darker pixels get more, so dark areas end up deeper.
You need height map images made for this. I like 3D Grayscale dot com for the quality of its images (no affiliation). I picked two designs: a dinosaur fossil, which felt right for something uncovered in stone, and a sailing ship with detailed masts and rigging.
Deep Engraving a Dinosaur Fossil Coaster
Import the image into LightBurn. To crop it, draw a shape on the same layer, set that layer to Line mode, select both the shape and the image, and click Use as Mask. Then set the image layer to 3D Slice.
| Setting | Main passes | Cleanup pass (every 5 layers) |
|---|---|---|
| Speed | 2000mm/s | |
| Power | 90% max | 30% |
| Frequency | 130kHz | 30kHz |
| Q-pulse | 250ns | 50ns |
| Line interval | 0.05mm | |
| Layers | 50 |
The 5 pass test cells reached about 0.2mm, so 50 passes should land around 2mm deep. The low-power cleanup pass was important when I deep engraved brass, so I kept it to see if slate needs it too.
The 60W source tore into the stone right away. Dust billowed off the surface, far more than my fume extractor could handle, and I doubt fresh filters would have kept up. Plan for a shop vac, which cleaned it up quickly.
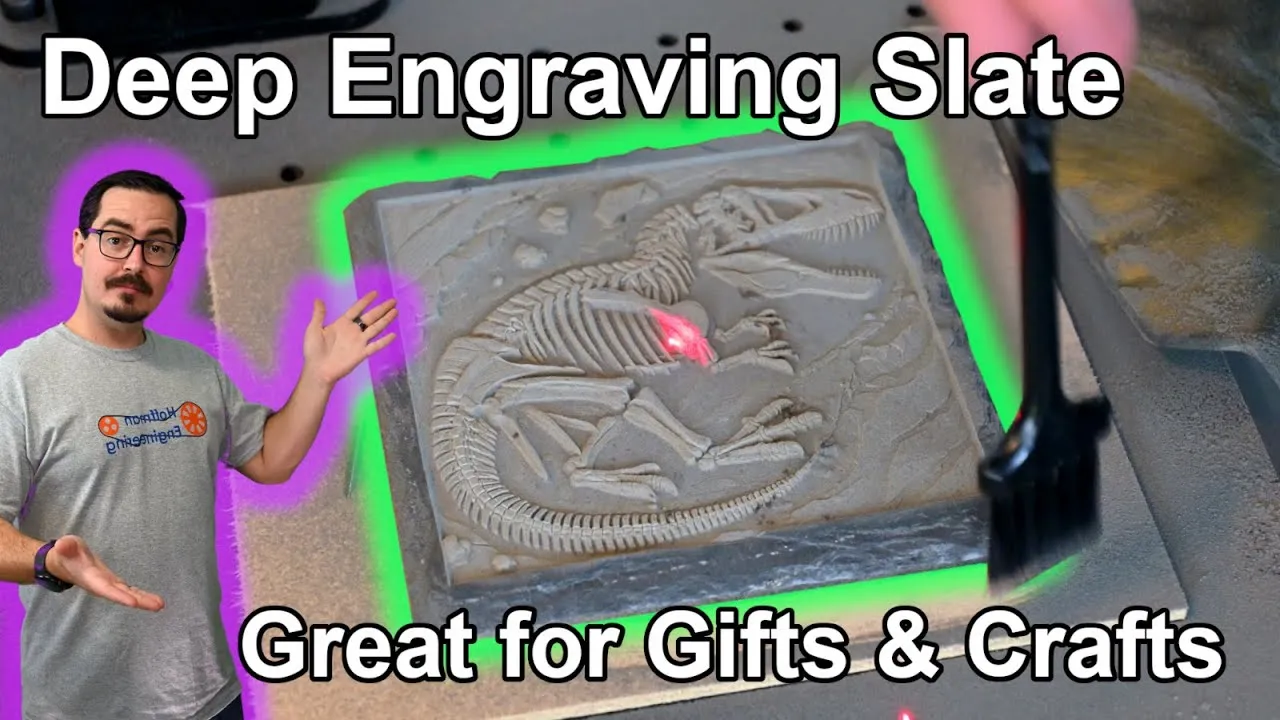
The engraving took about 1.5 hours, and it reached 2mm deep. It looks incredible. The fine details survived, from the small lines on the bones to the cracks in the rock, and with light coming in at a low angle the 3D effect shows clearly.
Deep Engraving a Sailing Ship Coaster
The ship design has a big empty sky, and I wanted to see how a large flat engraved area would come out. I also wanted more depth, so I raised the layer count from 50 to 65. Everything else stayed the same: 2000mm/s, 90% max power, 130kHz, 250ns Q-pulse, 0.05mm line interval, and the same cleanup pass at 30% power, 30kHz and 50ns every 5 layers.
This one took 1 hour 45 minutes. The dust was again pretty crazy, so give the laser (and anything sitting near it, like my laptop) a good cleaning after a session like this.
The result reached 2.8mm deep. The details held up as well as the fossil: rigging on the sails, the thin masts, even the portholes on the hull. And the flat sky came out smooth and even.
Results: What Slate Can Do on a Fiber Laser
Slate is a great laser material. Nearly every laser type can give it a high-contrast white surface mark. For deep engraving, though, a high-powered fiber laser is the tool for the job. The B6 60W MOPA removed 2 to 2.8mm of stone in under two hours per coaster, and at high frequencies it turned slate to lava.
You don’t need 60W. A 20W or 30W B6 MOPA should do the same job, only slower.
Tips
- Start low on frequency. Above 240kHz the slate melts instead of engraving. Clean removal began around 80kHz, and the best results came at 130kHz.
- Short pulses mark, long pulses dig. Under about 25ns you get a white surface mark; 250ns removed material well.
- Run a 5 pass test first and measure its depth. About 0.2mm per 5 passes let me predict the 50 layer depth.
- Refocus every coaster. Blank thickness varied from 3 to 7mm in one batch.
- Plan for dust. A fume extractor wasn’t enough. Keep a shop vac nearby and clean the machine afterward.
This post contains affiliate links. If you buy through them, I may earn a small commission at no extra cost to you.
FAQ
Can a fiber laser deep engrave slate?
Yes. At the right settings a MOPA fiber laser removes slate cleanly instead of only marking the surface. The ComMarker B6 60W MOPA cut a dinosaur fossil 2mm deep in 50 layers and a sailing ship 2.8mm deep in 65 layers.
What are the best fiber laser settings for deep engraving slate?
On the ComMarker B6 60W MOPA, the sweet spot was 130kHz frequency and a 250ns Q-pulse, at 2000mm/s, 90% power and a 0.05mm line interval in LightBurn's 3D Slice mode. A cleanup pass at 30% power, 30kHz and 50ns ran every 5 layers. Frequencies above 240kHz melted the slate into a bubbly, porous surface instead of removing it.
How long does it take to deep engrave a slate coaster?
The 50 layer dinosaur took about an hour and a half and reached 2mm deep. The 65 layer ship took 1 hour 45 minutes and reached 2.8mm. Both were 100 x 100mm coasters at 2000mm/s.
Do you need a 60W fiber laser to deep engrave slate?
No. A 30W or 20W fiber laser should do the same job, only slower. The 60W source removes material faster per pass.
What is LightBurn 3D Slice mode?
3D Slice engraves a grayscale height map one layer at a time over many passes. Lighter pixels get fewer passes and darker pixels get more, so dark areas end up deeper and the design comes out as a 2.5D relief.