InfiMech EX Review: A $259 CoreXY That Needs Tuning
A fast, open-frame CoreXY printer with direct Klipper config access for $259. Buy it if you're comfortable tuning a slicer profile. Beginners who expect the stock profile to deliver the best quality should hesitate.
Check price at InfiMechOn this page
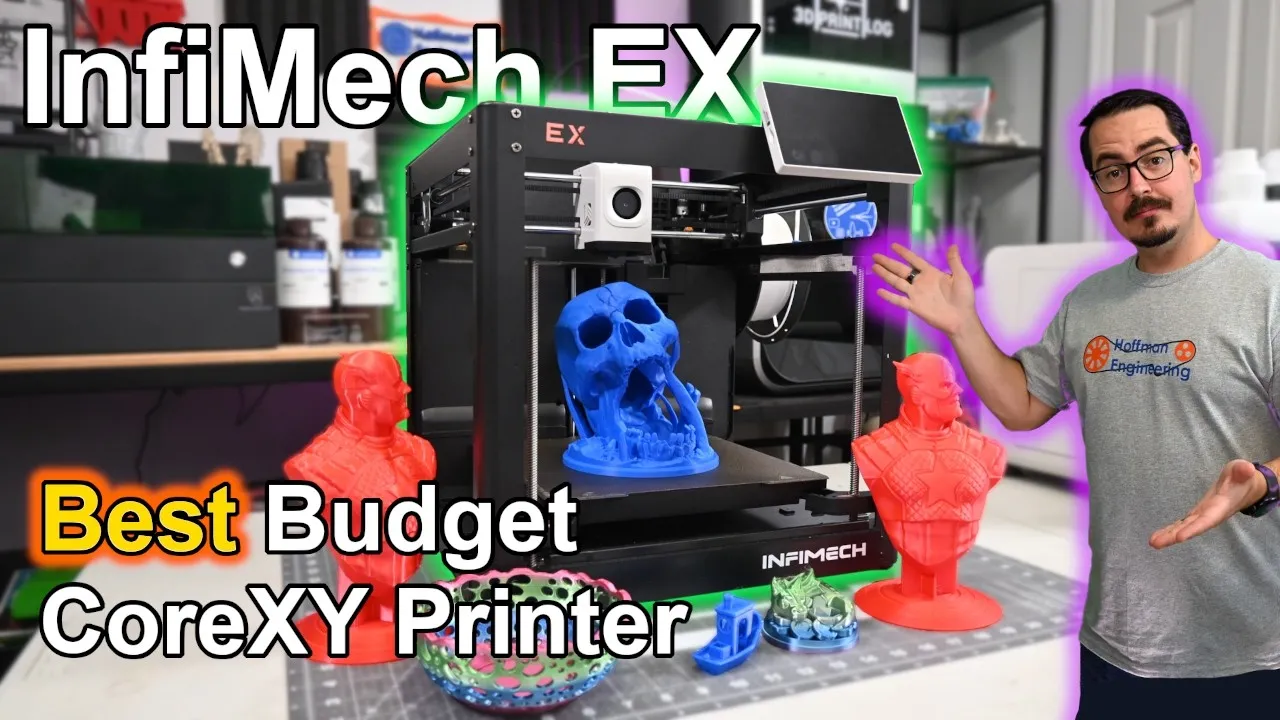
The InfiMech EX is a compact $259 CoreXY 3D printer running a configurable version of Klipper. The biggest surprise from a month of testing wasn’t how fast it could go. It was that printing faster produced a much better surface finish. This InfiMech EX review covers the hardware, the print quality, and the three slicer settings that fixed the artifacts on nearly every flat surface.
InfiMech EX Specs and Build Volume
The EX is a filament-based CoreXY printer. The two motors that move the print head stay bolted to the frame and share one belt loop, so there’s less weight moving around and the head can move faster. InfiMech rates it at up to 600mm/s.
Build volume is 250 x 250 x 205mm. The bed is generous, but the 205mm Z height feels short. Tall busts, helmets, and vases are where you’ll notice it. InfiMech’s other printer, the TX, gives you 250mm of Z on a smaller 220 x 220mm bed.
There are three versions: the base EX, the EX with the five-color MCS, and the EX with the APS, which swaps build plates on its own so the printer can keep running unattended. I tested the base, single-color EX without either attachment.
Open Klipper Configuration
The EX runs Klipper, and InfiMech gives you direct access to the configuration files. That’s one of the biggest reasons this printer stands out at $259, and I found two uses for it right away.
The first was bed leveling. My first automatic leveling run showed a slope across the bed. The mesh could compensate, but I’d rather start mechanically level and let the mesh handle the small variations. So I enabled a Klipper feature called screws_tilt_adjust. It uses the existing probe and tells you which direction to turn each bed screw and by how much. It found the right side was roughly a millimeter high. On a locked-down printer that feature is buried or unavailable. Here it was a few lines in a config file.
The second is my own project. Because the configuration is open, the EX connects straight to 3D Print Log and records print time, duration, and material usage automatically.
PEI Bed, Motion System, and Nozzle
The EX ships with a textured PEI spring steel plate. Prints stayed attached while hot and released with one flex once the plate cooled. I never used glue stick, hairspray, or any other adhesion additive. Not once in 25 prints. The bed heats to 110°C and worked well with PLA and PETG.
The CoreXY motion system never felt like the limiting factor. Input shaping calibration is built in and runs during initial setup. It measures the printer’s vibration, and Klipper compensates for those resonances to reduce ringing and ghosting at higher speeds. Even on faster prints the machine stayed controlled.
The nozzle is a 0.4mm hardened steel unit with a 300°C maximum, fed with 1.75mm filament. That means abrasive materials like carbon-fiber-filled filament aren’t immediately off the table. The open frame still limits which high-temperature materials are practical.
Touchscreen, WiFi, and the Missing Camera
There’s a 5-inch color touchscreen that’s responsive and puts most of Klipper’s controls at your fingertips. An SD card reader sits on the side of the screen for manual transfers. There are no USB ports, which is a strange decision on a printer that gets so much right.
The EX has WiFi and runs the Fluidd web interface, so you can open the printer in a browser on your local network to send prints, monitor progress, and watch temperatures.
But there’s no camera. It isn’t included and I couldn’t find one as an option. With no USB port, I don’t think you could add one aftermarket either. Remote monitoring without a camera means you can watch numbers change, but you can’t see whether the print is still on the bed. That’s the omission I’d most like to see fixed.
Assembly, Noise, and Power Loss Recovery
The EX arrives almost completely assembled. Remove the shipping foam and the three screws securing the bed, attach the screen and spool holder, connect the filament runout sensor, and power it on. The startup wizard walks you through WiFi, bed leveling, and input shaping calibration. I went from opening the box to starting my first test print in roughly 20 minutes.
While printing, the EX measured about 63 dB. The surprise is that it only dropped to around 60 dB while idle, because the electronics fans keep running. That made it far more noticeable between prints, and I usually powered it off instead of leaving it idle.
Power loss recovery got a real test. A storm knocked out power partway through a print. When power came back, the printer picked up where it left off and finished the model. The resumed layer left a visible seam, but it saved a five-hour print from the scrap bin.
The OrcaSlicer VFA Problem and the Fix
InfiMech recommends OrcaSlicer, which has built-in profiles for the EX. They work out of the box. They’re also the biggest problem with this printer.
Every flat vertical surface came out covered in VFAs, or Vertical Fine Artifacts. These are fine, regularly repeating vertical lines that often point to motor resonance, pulleys, or belt behavior. So I went looking for a hardware problem, and there wasn’t one.
OrcaSlicer’s VFA calibration prints a tower where each band runs at a different speed. On mine, outer-wall speeds from roughly 40 to 100mm/s produced visible artifacts, with 40 and 60 looking worst. Above 100, the surface became much cleaner.
The stock profile doesn’t explicitly set outer walls to 40mm/s. Its volumetric flow limit and minimum layer time work together to slow the model down, and on my prints that put the outer walls right around 40mm/s.
The fix is three settings in the filament profile:
- Minimum layer time: 4 seconds
- Maximum volumetric flow: 20mm³/s
- Outer-wall speed: 200mm/s
Those worked with the PLA and profile I was using. Validate maximum volumetric flow for each filament. I didn’t contact InfiMech about this, so I can’t say whether a profile update is coming.
InfiMech EX Print Quality: Test Prints
The Captain America bust is the clearest before and after. On default settings, VFAs ran up every flat surface. With the faster outer wall they were dramatically reduced, and the print went from 5 hours 50 minutes to 5 hours 5 minutes. The underside of the chin still printed cleanly.
A 3DBenchy on the stock profile finished in 50 minutes with clean overhangs and a smooth hull, plus the stock-profile VFAs on its flat surfaces.
The Kickstarter Autodesk torture test showed the other weakness: material left between the narrow pillars. I printed several retraction towers and adjusted the settings, and never eliminated it. The optimized profile was only marginally better. The overhangs and bridges were clean.
The Desert Kiss dice tower came out clean, with very little stringing on its separate pillars, so the problem seems worst during rapid, closely spaced travel moves. A baby dragon guardian kept its fine scales and facial details with a little stringing between the ears. A decorative bowl showed obvious stringing between sections, and all but the most extreme overhangs came out fine. A flexy squid, printed as many small separate segments, kept every segment stuck to the bare plate.
Price and the InfiMech TX Alternative
At the time of the review the base EX was $259, and it’s still $259 as of this writing. The five-color MCS bundle was listed at $359. The APS plate-changing version was $630 when I recorded and is listed at $419 for the US as of this writing. Both accessory bundles were out of stock when I checked during the review, so confirm availability before you plan around them.
The harder comparison is InfiMech’s own TX. It costs $60 less and trades some bed area and speed for an enclosure and more vertical build height.
So the EX buys you a bigger bed and a faster machine. The TX buys you an enclosure and more height for less money. Buy the EX for the larger footprint and the speed, if you’ll spend an hour in the slicer to get it. Buy the TX if you want to print ABS or ASA, or if you print tall.
Verdict: Should You Buy the InfiMech EX?
The InfiMech EX is a fast, open 3D printer at a price that’s hard to beat. The CoreXY design is quick, the hardened steel nozzle is standard, the textured PEI plate never needed glue across 25 prints, and direct access to the Klipper configuration gives experienced users a lot of control.
The tradeoff is that the tuning is your job. The stock OrcaSlicer profile pushed my outer walls into the machine’s worst VFA range, and I never completely solved the stringing. There’s no camera on an otherwise well-connected machine, and 205mm of Z is short for this bed size. Those aren’t deal breakers for me at this price.
I can recommend the EX to someone comfortable tuning a slicer who wants a fast CoreXY machine with accessible Klipper configuration files. I’d hesitate to recommend it to a beginner who expects the stock profile to deliver the printer’s best quality immediately. If you want a printer that’s correct the day it arrives and you don’t want to open a config file, this might not be the one for you.
Check the latest price on the InfiMech EX
Pros and cons
✓ Pros
- Direct access to the Klipper configuration files at $259
- CoreXY motion with input shaping calibration that runs during first setup
- Textured PEI plate held 25 prints with no glue or other adhesion additive
- Hardened steel 0.4mm nozzle and a 300°C hotend as standard
- Arrives almost completely assembled. About 20 minutes from box to first print
- Power loss recovery saved a five-hour print after an outage
- Tuned slicer settings gave a better surface finish and a print 45 minutes shorter
✗ Cons
- Stock OrcaSlicer profile put outer walls in the printer's worst VFA speed range
- Stringing between closely spaced features that retraction tuning never eliminated
- No camera, and no USB port to add one
- 205mm Z height is short for a printer with a 250 x 250mm bed
- Electronics fans keep running at about 60 dB when the printer is idle
- Open frame limits which high-temperature materials are practical
Specs
| Build Volume | 250 x 250 x 205mm |
|---|---|
| Motion System | CoreXY with automatic input shaping calibration |
| Max Speed | 600mm/s rated. Outer walls looked cleanest above 100mm/s in testing |
| Hotend Max Temp | 300°C |
| Nozzle | 0.4mm hardened steel, 1.75mm filament |
| Bed | Textured PEI spring steel, heated to 110°C |
| Enclosure | None (open frame) |
| Firmware | Klipper with direct config file access, Fluidd web interface |
| Screen | 5-inch color touchscreen |
| Connectivity | WiFi and SD card. No USB ports, no camera |
| Noise (measured) | About 63 dB printing, about 60 dB idle |
Where to buy
- InfiMech EX (base printer)$259 →
- InfiMech EX + 5-Color MCS$359 →
- InfiMech EX + APS Automatic Plate Swapper$419 →
- InfiMech TX (enclosed)$199 →
- InfiMech TX + Camera + Fan + Filter$299 →
- Sunlu 1kg PLA (filament used in this review)Check price →
- Sunlu 1kg Matte PLA (filament used in this review)Check price →
Prices may have changed since this review.
FAQ
Is the InfiMech EX worth it?
At $259, the InfiMech EX is a fast CoreXY printer with direct access to its Klipper configuration files, a hardened steel nozzle, and a PEI plate that never needed glue in 25 prints. The tradeoff is that the tuning is your job. I can recommend it if you're comfortable adjusting a slicer profile, and I'd hesitate to recommend it to a beginner who expects the stock profile to deliver its best quality.
How do you fix VFAs on the InfiMech EX?
On my unit, outer-wall speeds from roughly 40 to 100mm/s produced visible VFAs, and the stock OrcaSlicer profile slowed outer walls to around 40mm/s. In the filament profile, I reduced minimum layer time to 4 seconds, raised maximum volumetric flow to 20mm³/s, and set the outer-wall speed to 200mm/s. Those values worked with the PLA I was using. Validate maximum volumetric flow for each filament.
Does the InfiMech EX run Klipper?
Yes. The EX runs Klipper with the Fluidd web interface, and InfiMech gives you direct access to the configuration files. I used that to enable screws_tilt_adjust for mechanical bed leveling and to connect the printer to 3D Print Log for automatic print tracking.
Does the InfiMech EX have a camera?
No. There's no camera included and no camera option that I could find. The EX also has no USB ports, so I don't think you could add one aftermarket. You can monitor temperatures and progress over WiFi through Fluidd, but you can't see the print.
Should you buy the InfiMech EX or the InfiMech TX?
The EX gives you a bigger 250 x 250mm bed and a faster machine. The TX costs $60 less and gives you an enclosure and 250mm of Z height on a smaller 220 x 220mm bed. Buy the EX for the footprint and the speed if you'll spend an hour in the slicer. Buy the TX if you want to print ABS or ASA, or if you print tall.
This InfiMech EX was provided by InfiMech for review, and Sunlu provided the filament. This post contains affiliate links. If you purchase through them, I may earn a small commission at no extra cost to you. All opinions are my own.